
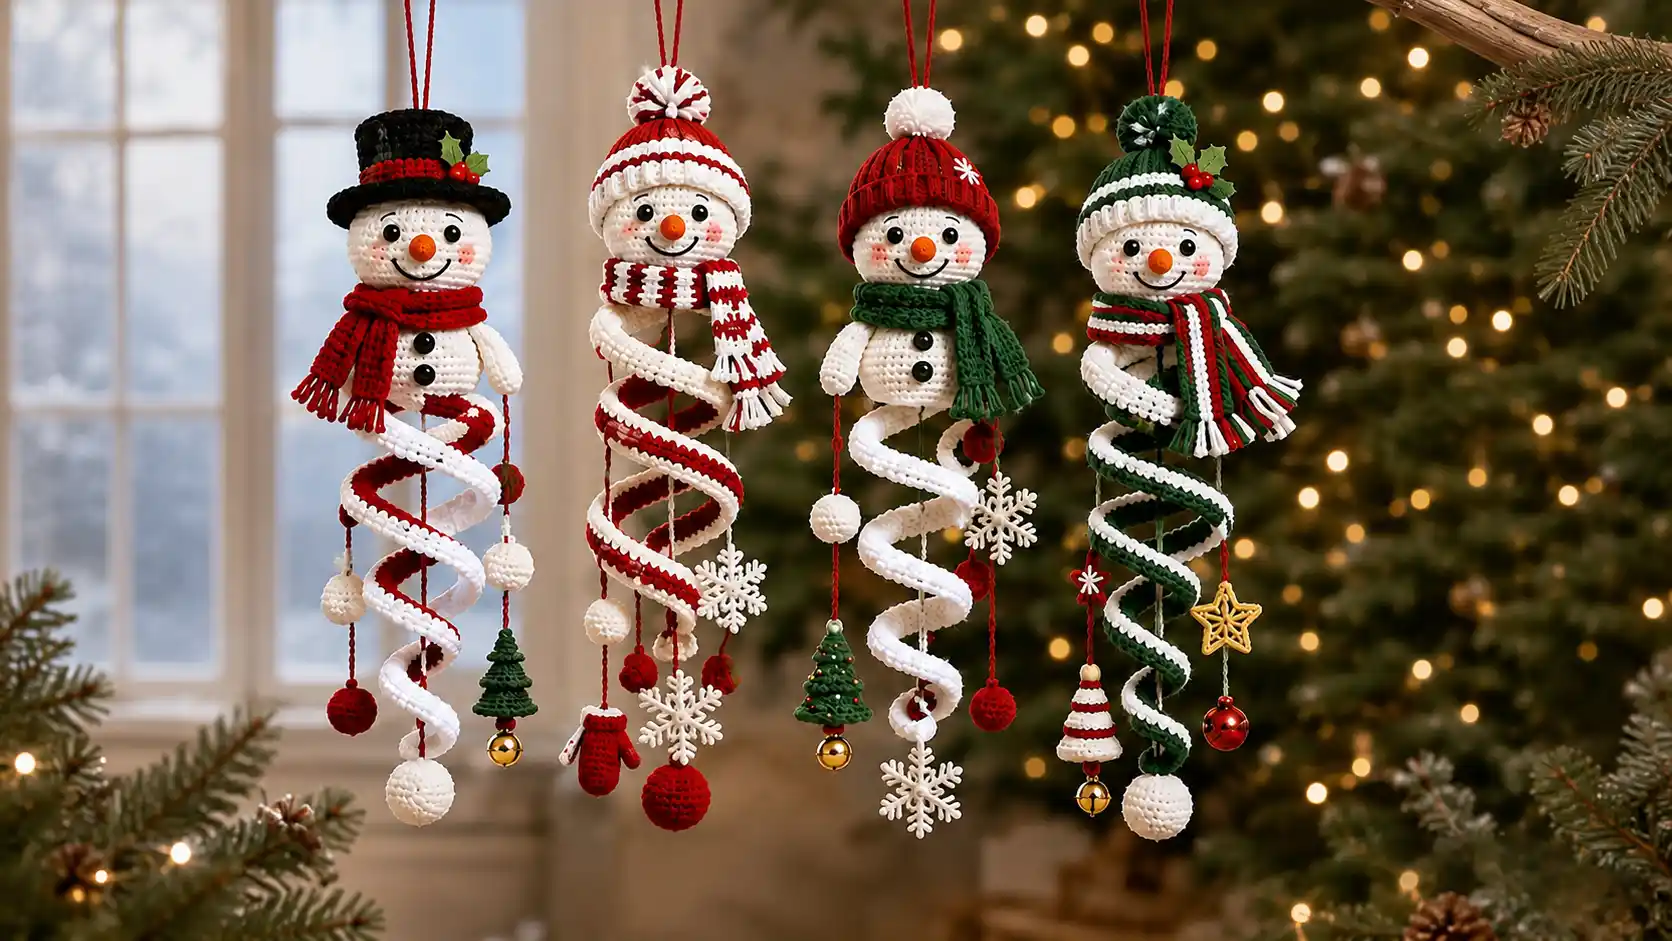
Crochet Snowman Hanging Ornament Pattern FREE — 4 Designs in One
A crocheted snowman hanging ornament is one of those Christmas makes that people reach for the moment they walk into a room. This free crochet snowman hanging ornament pattern gives you four completely different designs in one collection, each with a two-ball stuffed snowman body, orange carrot nose, coal-dot smile, rosy cheeks, a design-specific hat and scarf, a self-curling corkscrew spiral below the body, and a set of miniature bottom ornaments that jingle, sway, and catch the light from a window or tree branch.
All four designs share the same snowman head, body, arms, and spiral construction. Only the hat, scarf colors, spiral edging, and bottom ornaments change between them. Build the shared pieces once and then follow only the section for your chosen design to complete it.
Materials Needed
| Item | Detail |
|---|---|
| Yarn — white or cream | DK weight (3) cotton or acrylic, approximately 80g total for all 4 |
| Yarn — Christmas red | DK weight (3), approximately 40g total |
| Yarn — forest green | DK weight (3), approximately 30g total |
| Yarn — black | DK weight (3), approximately 15g total |
| Yarn — orange | DK weight (3), approximately 5g total |
| Yarn — pink | DK weight (3), approximately 5g total |
| Yarn — gold | Small amount for star detail (Design 4) |
| Hook | 3.5mm (US E/4) for snowman body and hats |
| Hook | 4.0mm (US G/6) for the spiral sections |
| Safety eyes | Two 8mm black per snowman (8 pairs total for a full set) |
| Polyfill stuffing | Approximately 15g per snowman |
| Tapestry needle | For sewing and face embroidery |
| Stitch markers | At least 3 |
| Hanging cord | Red yarn or ribbon, approximately 20cm per ornament |
| Bottom ornaments | Gold jingle bells, snowflake charms, or crocheted pieces (see each design) |
| Scissors | Sharp fabric scissors |
Finished Size
| Measurement | Size |
|---|---|
| Total hanging length | Approximately 35 to 40cm (14 to 16 in) |
| Snowman head diameter | Approximately 5.5cm (2.25 in) |
| Snowman body diameter | Approximately 4cm (1.6 in) |
| Spiral section length | Approximately 15 to 18cm (6 to 7 in) |
| Number of spiral turns | 9 turns |
Skill Level
Advanced Beginner to Intermediate. The snowman uses basic amigurumi. The spiral uses the 4-dc-per-chain technique explained in full below. Read the spiral section before picking up your hook. Estimated time per ornament: 3 to 4 hours.
Abbreviations
| Abbreviation | Meaning |
|---|---|
| MR | Magic ring |
| ch | Chain |
| sl st | Slip stitch |
| sc | Single crochet |
| hdc | Half double crochet |
| dc | Double crochet |
| inc | Increase: 2 sc in same stitch |
| dec | Invisible decrease |
| BLO | Back loop only |
| rnd | Round |
| rep | Repeat |
| [X] | Stitch count at end of round or row |
Pattern Notes
All four designs share one identical snowman construction — head, body, nose, face, arms, and spiral base. Only the hat, scarf, spiral edging, and bottom ornaments change. Build the shared pieces first, then follow only your chosen design section.
The spiral uses 4 dc packed into every single chain stitch. This density forces the strip to curl into a corkscrew automatically. You do not shape it by hand. If the strip is not curling after 10 stitches, check that you are working exactly 4 dc into each chain stitch with no exceptions.
Continuous spiral for snowman: Work the head and body in a continuous spiral without joining at the end of each round.
Hang cord placement: The hanging cord threads through the top of the head from side to side and the loop extends above the head. It is inserted before the head is closed.
Shared Pieces — Make for Every Design
Snowman Head (Make 1)
Work in white yarn on a 3.5mm hook.
Rnd 1: MR, 6 sc. [6] Rnd 2: Inc x6. [12] Rnd 3: (Sc 1, inc) x6. [18] Rnd 4: (Sc 2, inc) x6. [24] Rnd 5: (Sc 3, inc) x6. [30]
Rnds 6 to 9: Sc around. [30] — 4 even rounds.
Place safety eyes between Rnds 7 and 8, approximately 5 stitches apart.
Before closing, thread a 20cm length of red yarn through the top of the head at Rnd 1 from side to side. Pull the two ends even and tie together above the head to form the hanging loop. Tie the knot firmly inside the head after the loop is positioned.
Rnd 10: (Sc 3, dec) x6. [24] Rnd 11: (Sc 2, dec) x6. [18]
Begin stuffing firmly.
Rnd 12: (Sc 1, dec) x6. [12] Rnd 13: Dec x6. [6]
Fasten off leaving a short tail. Close opening.
Snowman Body (Make 1)
Work in white yarn on a 3.5mm hook.
Rnd 1: MR, 6 sc. [6] Rnd 2: Inc x6. [12] Rnd 3: (Sc 1, inc) x6. [18] Rnd 4: (Sc 2, inc) x6. [24]
Rnds 5 to 7: Sc around. [24] — 3 even rounds.
Rnd 8: (Sc 2, dec) x6. [18]
Stuff firmly.
Rnd 9: (Sc 1, dec) x6. [12] Rnd 10: Dec x6. [6]
Fasten off leaving a long tail. Close opening.
Body buttons: Using black yarn and tapestry needle, embroider 3 small satin stitch dots down the center front of the body at Rounds 5, 6, and 7.
Face Embroidery
Nose: With orange yarn, embroider a small filled triangle between and below the eyes using satin stitch. Alternatively, make a tiny crocheted nose: MR, 4 sc, pull tight, sew to face.
Smile: Using black yarn, embroider 6 to 7 small French knots or satin stitch dots in a gentle upward curve below the nose.
Rosy cheeks: Using pink yarn or embroidery floss, work 4 to 5 small satin stitch dots in a soft circle on each cheek below and outside each eye.
Arms (Make 2)
With white yarn.
Ch 10. Sl st back along every chain to the base. [2 strands twisted = small cord arm]
Fasten off leaving a long tail. The finished arm is a small thin cord approximately 3cm long. Make 2.
Sew one arm to each side of the body at the upper sides, pointing slightly outward and upward.
Head to Body Join
Position the head on top of the body, face pointing forward. Using the long body tail, sew in a complete circle around the neck join. Work the circle twice for strength. Add extra stuffing through the neck opening before closing if either piece feels at all soft.
Self-Curling Spiral
Use the 4.0mm hook for this section. Work in the main spiral color for your chosen design (white for Designs 1, 2, and 3 — forest green for Design 4).
Foundation chain: Ch 91. Count carefully in groups of 10 as you chain. Place a stitch marker at every 10th stitch. You should have 9 markers total at positions 10, 20, 30, 40, 50, 60, 70, 80, and 90.
How the spiral works: Instead of one stitch per chain, you work 4 dc into every single chain stitch. The excess fabric cannot lie flat so it ruffles and twists into a continuous corkscrew automatically. Do not try to shape it by hand.
Working the spiral: Insert hook into the 2nd chain from hook. Yarn over, pull up loop, yarn over, pull through 2 loops (1 dc complete). Without moving to a new chain, work 3 more dc into that same chain stitch for a total of 4 dc in that one chain. Move to the next chain. Work 4 dc. Continue along all 90 chains, working exactly 4 dc per chain stitch throughout.
After the first 10 chains you should see the strip already twisting and curling. If it is still completely flat, recount that you are working 4 dc, not fewer, into every chain.
Fasten off leaving a long tail of at least 15cm (6 inches) at the bottom end for attaching bottom ornaments.
Adding the edging: Each design uses a different edging color along both long edges of the spiral. See the specific design sections below.
Design 1 — Classic Top Hat Snowman
Hat colors: Black approximately 15g. Christmas red approximately 3g. Forest green approximately 3g for holly.
Scarf: Christmas red with fringe. Long striped scarf approximately 30cm.
Spiral edging: Christmas red.
Bottom ornaments: Large white pompom, small green mini Christmas tree, small red pompom ball, gold jingle bell.
Black Top Hat
Work in black yarn.
Crown flat circle: MR. Rnd 1: 6 sc. [6] Rnd 2: Inc x6. [12] Rnd 3: (Sc 1, inc) x6. [18] Rnd 4: (Sc 2, inc) x6. [24] Rnd 5: (Sc 3, inc) x6. [30] Rnd 6: (Sc 4, inc) x6. [36]
Cylinder sides: Rnds 7 to 18: BLO sc around. [36] — 12 rounds, approximately 4cm tall cylinder.
Red hatband: Rnds 19 to 20: Switch to red. Sc around. [36]
Brim: Switch to black. Rnd 21: (Sc 5, inc) x6. [42] Rnd 22: (Sc 6, inc) x6. [48] Rnd 23: Sc around. [48] Fasten off.
Holly detail: Two tiny green leaf shapes (Ch 6, sc back along chain, work around other side). Three tiny red berries (MR, 5 sc, pull tight). Sew to red hatband.
Sew the finished hat to the top of the snowman head.
Red Scarf
Ch 5. Sc rows for 30cm total length. Fasten off. Attach fringe: cut 5cm lengths and knot into each stitch of both short ends. Trim fringe evenly. Wrap around the snowman neck and tack loosely at the front.
Spiral Edging — Design 1
Join Christmas red along the OUTER (fuller, ruffled) edge of the spiral. Work (sk 1, shell of 5 dc in next st, sk 1, sl st in next st) evenly along the entire outer edge. Fasten off.
Join forest green along the SPINE (original foundation chain) edge. Work 1 round of sc evenly. Fasten off.
Bottom Ornaments — Design 1
Large white pompom: Wrap white yarn around 3 fingers 30 times. Tie firmly at center. Cut loops. Trim round. Diameter approximately 3.5cm. Attach to the bottom tip of the spiral with a 5cm hanging cord.
Mini Christmas tree: With forest green. MR, 6 sc. (Inc x6) = 12. 2 even rounds. (Sc 1, dec) x4 = 8. Even round. (Dec) x4 = 4. Close. Sew a small brown sc stem to the base. Hang on a 4cm cord from the spiral bottom beside the pompom.
Red pompom ball: Small red pompom approximately 1.5cm diameter. Hang on a 3cm cord.
Gold jingle bell: Attach at the very bottom on the longest cord.
Design 2 — Red and White Striped Snowman
Hat colors: Christmas red and white stripes with red/white pom-pom.
Scarf: Christmas red and white stripes, very long approximately 35cm.
Spiral edging: Christmas red.
Bottom ornaments: White snowflake, small white pompoms, mini Christmas tree, red ball, gold jingle bell.
Red and White Striped Beanie
Work in joined rounds. Alternate 2 rounds red, 2 rounds white throughout.
MR. Rnd 1: 6 sc. [6] Rnd 2: Inc x6. [12] Rnd 3: (Sc 1, inc) x6. [18] Rnd 4: (Sc 2, inc) x6. [24] Rnd 5: (Sc 3, inc) x6. [30] Rnd 6: (Sc 4, inc) x6. [36]
Rnds 7 to 14: Sc even at 36 sts in 2-round stripe sequence. [36]
Rnd 15 (ribbed brim): BLO sc around. [36] Fasten off.
Pom-pom: Mix red and white yarn together in one pompom approximately 2cm diameter. Sew to the hat top.
Sew hat to head.
Red and White Striped Scarf
Ch 5. Work sc rows alternating 2 rows red, 2 rows white for 35cm total. Fringe in red and white mixed. Wrap at neck, tack loosely.
Spiral Edging — Design 2
Both edges: Join red, work 1 round sc base, switch to white, work (sk 1, shell 5 dc, sk 1, sl st) scallop overlay on both edges. Fasten off.
Bottom Ornaments — Design 2
White snowflake: MR, 12 sc. (Ch 5, sl st back along chain, sl st into next 2 sts of rnd) x6. Starch flat. Attach on 6cm cord.
White pompom x2: Two small 1.5cm white pompoms on cords of different lengths.
Mini Christmas tree: Same as Design 1. Hang on 4cm cord.
Gold jingle bell: Very bottom, longest cord.
Design 3 — Solid Red Beanie Snowman
Hat colors: Christmas red solid with white snowflake embroidery and white pom-pom.
Scarf: Forest green simple scarf, shorter approximately 22cm.
Spiral edging: Forest green outer, red spine.
Bottom ornaments: White snowflake, small green Christmas tree, red pompom ball, gold jingle bell.
Solid Red Beanie
Work in red throughout, joined rounds.
MR. Increase same as Design 2 through Rnd 6. [36 sts]
Rnds 7 to 14: Sc even. [36]
Rnd 15: BLO sc. [36] Fasten off.
White snowflake embroidery: Using white yarn and a tapestry needle, embroider a small 6-point star on the front of the hat body at approximately Rnd 10, working 3 crossing straight stitches through the hat surface.
White pom-pom: Small 2cm white pompom sewn to hat top.
Sew hat to head.
Green Scarf
Ch 5. Sc rows in solid forest green for 22cm. Fringe both ends in green. Wrap at neck.
Spiral Edging — Design 3
Outer edge: Join forest green. Work scallop (sk 1, 5 dc shell, sk 1, sl st) along full outer edge. Fasten off.
Spine edge: Join red. Work 1 round sc. Fasten off.
Bottom Ornaments — Design 3
Same as Design 2 in green and red colorway.
Design 4 — Green and White Striped Snowman
Hat colors: Forest green and white stripes with holly and green pom-pom.
Scarf: Red, white, and green three-color striped scarf approximately 28cm.
Spiral edging: Forest green base with white scallop overlay on both edges.
Bottom ornaments: Gold star charm, red pompom ball, small jingle bells, mini Christmas tree.
Green and White Striped Hat with Holly
Work in joined rounds alternating 2 rounds green, 2 rounds white.
MR. Increase same as Designs 2 and 3 through Rnd 6. [36 sts]
Rnds 7 to 14: Sc even in green/white 2-round stripe. [36]
Rnd 15: BLO sc. [36] Fasten off.
Holly decoration: Two tiny green leaves (Ch 6, sc around chain). Two tiny red berries (MR, 5 sc, pull tight). Sew to front of hat at the brim join.
Green pom-pom: 2cm green pompom sewn to hat top.
Sew hat to head.
Three-Color Striped Scarf
Ch 5. Work sc rows in sequence: 3 rows red, 2 rows white, 3 rows green, 2 rows white, repeat for 28cm total. Fringe all three colors mixed at both ends.
Spiral Edging — Design 4
Both edges: Join forest green, sc base round, switch to white, work scallop overlay on both edges.
Bottom Ornaments — Design 4
Gold star: Purchase a small gold star charm or crochet: MR, 10 sc. (Ch 3, sl st back down chain, sl st in next 2 sts) x5 for 5 points. Starch flat. Attach on 7cm cord.
Red pompom ball: 1.5cm red pompom on 5cm cord.
Two small jingle bells: Two real gold jingle bells approximately 1cm each, hanging on 3 and 4cm cords.
Mini Christmas tree: Same construction as Design 1.
Final Assembly for All Designs
Attach the top of the spiral to the underside of the snowman body, stitching through both pieces in a complete circle at least twice. This join carries the full weight of the spiral and bottom ornaments so work it more firmly than any other join in the pattern.
Tie or sew each bottom ornament to a separate short length of yarn or thread. Attach all cords to the very bottom tip of the spiral, gathering and knotting them at different lengths so they hang in a staggered cascade.
Check the hanging loop at the top of the head. The ornament should hang straight with the snowman face forward and the spiral curling naturally below. Gently reshape any uneven spiral turns by hand.
Tips and Tricks
- Mark your spiral chains in groups of 10 before crocheting a single stitch into them. Losing count on a 90-chain foundation is the most common mistake in the spiral section. Ten seconds of marker placement saves having to count back from stitch 60 while holding a twisted strip.
- Make both the head and body at the same sitting to keep tension identical. A head and body worked at different tensions on different days will rarely look like they belong together even when using the same yarn and hook.
- Attach bottom ornaments on cords of clearly different lengths. The cascading effect visible in the reference photo comes from ornaments at 3cm, 5cm, and 7cm cords respectively. Ornaments hung at the same length cluster together and the individual pieces lose their visual impact.
- Work both long edges of the spiral before shaping it by hand. The edging stitches add structure that helps the spiral hold its corkscrew form. A spiral edged on both sides before handling is significantly easier to shape and more likely to stay in the correct corkscrew position after hanging.
- Use a swivel clip at the top of the hanging cord if you want the ornament to spin freely in air movement. Without a swivel, the hanging cord will gradually twist and the ornament will spin to one side and stop. A small swivel clip rated for light loads added between the cord and the hanging point allows continuous free rotation.